
In my second year of graduate school, I researched the use of non ceramic materials as a way to create non-fragile table legs. I learned to make two-piece silicone molds for cast resin.


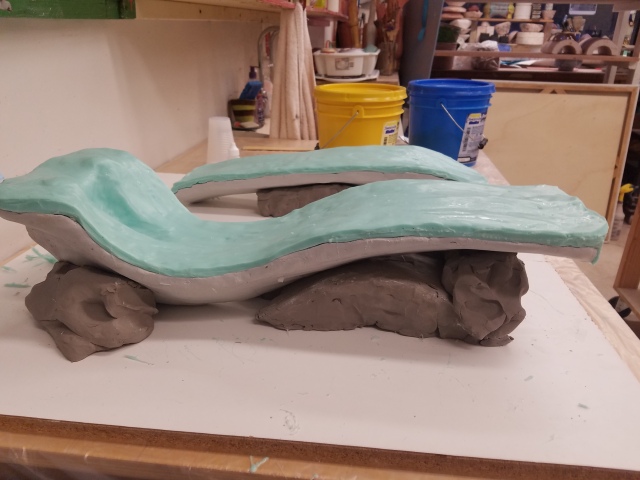
Here, the finished sculpted wet clay table legs are set up with a clay coddle that extends to the halfway point of the form. I use plastic button keys here as a way of making sure the finished mold locks together well. A section of all thread bolt at the top of the leg can be molded as part of the leg for attaching the cast resin to a ceramic table top using a nut. When making silicone molds, undercuts and complex forms do not impede the mold being removed from the cast because the mold material is flexible. Some silicone rubbers are able to even turn inside out to release a cast, and return to original shape.
For my molds I used Reynold’s Advanced Materials‘ Rebound 40 silicone. This is a platinum cure silicone, which is more durable and lasts longer than a tin cure. It can be easily measured and mixed by a volume ratio of equal parts A and B. The Rebound 40 product is slightly more rigid than the Rebound 25, again allowing for more durability and strength with less possibility of tearing.

The first layer of rubber that is applied is called a print coat, or stipple coat. This is because it is the thinnest, and most liquid state of the rubber, meant to capture all details and reduce the amount of air bubbles on the surface. A cut off chip brush can be a useful tool for stippling the rubber to reduce air bubbles. This coat is often very runny, and flows easily over details, but can become thick in lower places if not carefully controlled.

With each successive coat, a thickener called THI-VEX is added to the silicone. Only a few drops is necessary to thicken the rubber so it stays on the high points of the original being molded. Coats can be applied about every 20-30 minutes once the rubber becomes tacky to the touch. Once 3-4 coats are applied, the mother mold can be applied to the first side. For a mother mold material I used Free Form Air. This is a two part kneedable epoxy dough, which when mixed together hardens to a durable rock hard shell that supports the rubber in its original form for casting. Free Form Air is also very lightweight and can even float in water after hardening. The benefit of this is that large molds are not heavy or cumbersome as they would be with a plaster mother mold. This is also a safer, easier material to use than a resin fiberglass mother mold.

A release called Sonite Wax is used as a barrier between the silicone and the epoxy mother mold. This prevents the epoxy from sticking to the silicone, or anything else it touches. The epoxy can be pancaked out into thin, even slabs to reduce the weight of the mother mold even further. As the epoxy sets, it can be smoothed with isopropyl alcohol. It can also be surformed, sanded, and drilled after setting. This can allow the use of bolts to tighten the mold halves together, and removal of sharp edges on the mother mold.

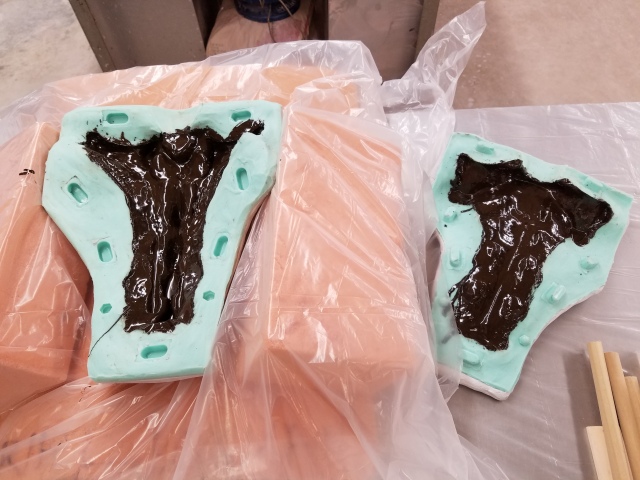
After 24 hours, the epoxy is set, and the process is able to be repeated on the other side. I used Sonite Wax as a release between the two silicone halves of the mold. Silicone releases from almost any other material easily, except it always sticks to itself. If you forget the release between the silicone halves of the mold it will not come apart. There are two types of silicone bonds to other materials, mechanical and chemical. In a potential mechanical bond, Sonite Wax can seal a porous material to prevent the silicone from locking into it. With a chemical bond, such as silicone to silicone, a release spray may be needed to seal the material, such as Ease Release 200.
A second mother mold of epoxy is added to this side once the silicone has set. If too thin, the epoxy will always stick to itself, and can be applied once the first layer has set up.

Once the molds were complete, I used rubber bands to bind the two halves, and poured liquid resin into them. The resin I used is called Smooth Cast Onyx and has an opaque black color. Resin always takes on the surface of the original molded material. If the original material is glossy or shiny, the resin cast will be also. Because my table legs were made of wet clay, the resin takes on that wet clay sheen, but is not shiny.

Smooth Cast Onyx FAST sets hard in about 15 minutes and has a pot life of about 2.5 minutes. With this material I was able to replicate the table leg forms very quickly. Each leg is cast in two parts (top and bottom), and had to be attached. First, I used a dremel tool and sandpaper to remove the resin seam lines from the side of the legs, and a band saw to cut off the blocks on the ends created by the pouring gates on the molds. I drilled holes in each section and glued metal pins between them. The seam was filled in with Apoxie Sculpt (Black) to match the resin. This sculptable, kneadable epoxy smooths with water, and can be easily carved and textured to match the carvings at the seam line.

Here you can see how the legs are designed to accompany a ceramic table top. Holes were drilled in the clay to allow the threaded bolts on the legs to push through and be attached securely to the fired ceramic with a nut.

The finished result. The ceramic glaze matched the resin table legs well, but the length, and thinness of the legs caused them to be springy, and not hold up any weight besides the table top. This was a good experiment to see how far I could push these thin, curvilinear legs with another material that is not as fragile as clay.

I also experimented with the same materials to make a mold of a cow vertebrae bone. I cast this in resin mixed with Reynold’s Bronze Powder to create a cold cast bronze effect. Real bronze powder is mixed with resin and painted in each half of the mold as a gel coat. The mold can be put together and the gel coat backed with the Onyx resin. The finished cast can be polished to look like cast bronze.

Ariel, you are amazing! I’m so impressed and proud for you! Patti Waser
________________________________